Junior Programmer: Manage Scene Flow and Data

Introduction

Milestone 4 exposed you to most of the advanced programming skills needed for basic Unity programming; milestone five will extend these ideas and start talking about the concept of “persistence” or storage/lifetime of data. These new tools and ideas will allow you to create Unity games containing multiple levels and different menus. You’ll also get some basic exposure to object-oriented programming, which will be expanded on in the next and final milestone. This milestone will also give you more important data structures, specifically the “manager” pattern, which is common throughout Unity. You’ll bring all of these skills together in the milestone project, which improves the original Caterpillar game extensively.

Goals

After completing this milestone, you should be able to demonstrate the following skills:

  • Understand and plan out a scene flow for a Unity project.
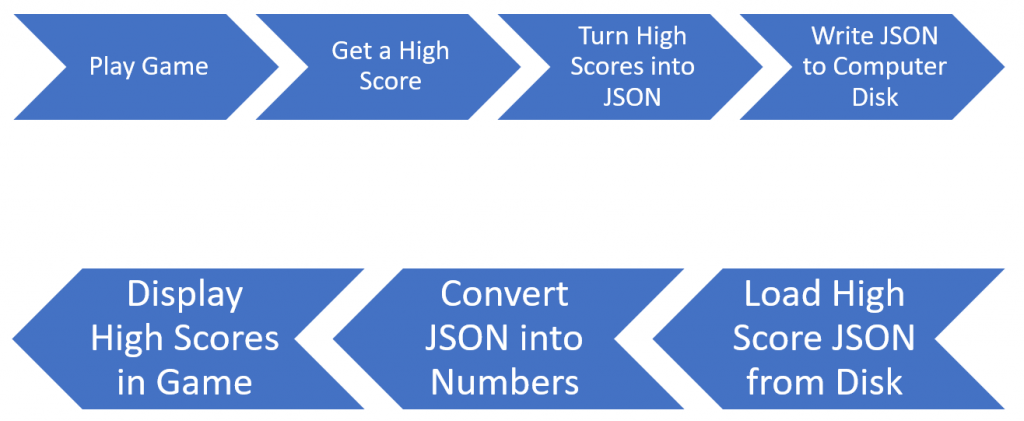
  • Understand data persistence
    • “Scope/Lifetime” of data (how long should the data last?)
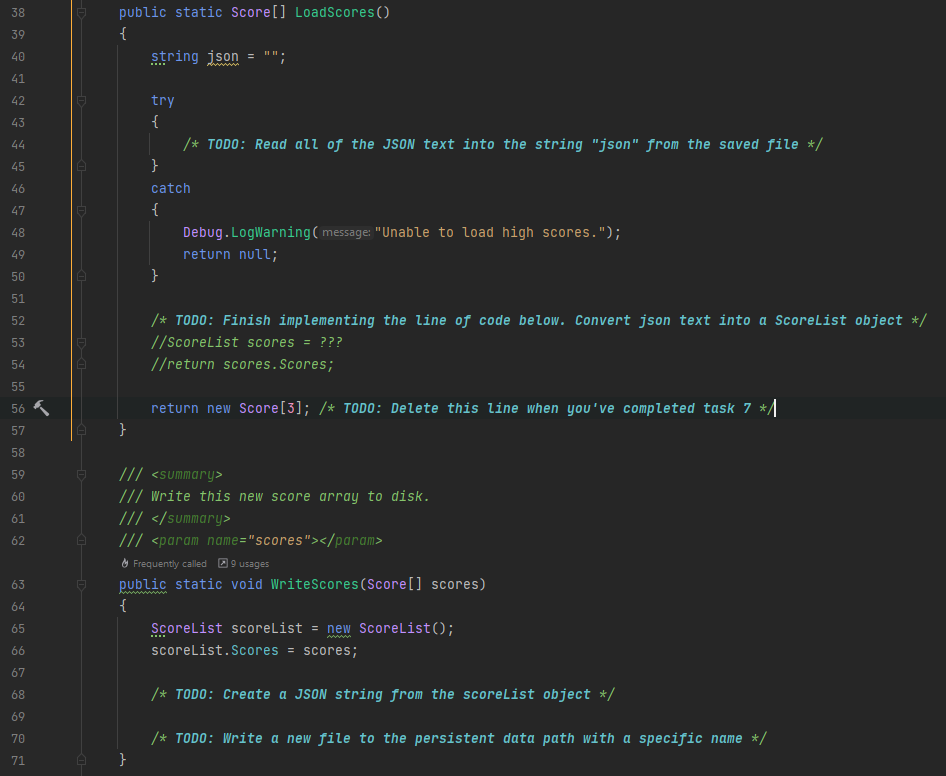
    • Storage of data (how is the data stored and read?)
  • Understand object persistence
    • DontDestroyOnLoad usage.
    • Loading and unloading scenes.
  • Gain basic exposure to object-oriented programming.

Learning Objectives

StandardDescription
3A-DA-09Translate between different bit representations of real-world phenomena, such as characters, numbers, and images.
3A-DA-10Evaluate the tradeoffs in how data elements are organized and where data is stored.
3B-AP-14Construct solutions to problems using student-created components, such as procedures, modules, and/or objects.

Content

Once again, you will be using Unity learn for your learning materials. Specifically, you should work through the “Manage scene flow and data” mission (part of the Junior Programmer pathway). This shorter Unity lesson focuses on menu development, movement between scenes, and data and game state management across multiple scenes. You’ll begin by setting up their sample project, followed by an introduction to object-oriented programming, and finish up by talking about data persistence.

Recommended

Because this is a short Unity Learn lesson, you should complete all of the tutorials in the mission.

Milestone Project – Caterpillar 2

A screenshot of the high score screen, which you will implement during this challenge.

For your milestone challenge, you will extend the ideas of the original Caterpillar game. You will work with data persistence, data movement, and level design to create a more comprehensive game.

Task 0: Download the Project Template

NOTE: There could be a version mismatch when downloading this Unity project to work on it. If Unity warns you about a version mismatch, open the project anyways with whatever version you have installed. We aren’t doing anything during these projects that would break if you use a different version of Unity.

Download the updated project template from the resources page to start this milestone. While we are improving the original, there are also other changes made to the game, which you will need to be successful with this milestone. The resources are located on our resources page under the milestone 5 heading. Assets are provided as a zip file containing an entire project inside. Extract the project from the file, and save it in a location that is convenient to you. Once extracted, you should be able to open the root folder project with Unity Hub (Hub > Open > Folder) and open the project in the Unity editor.

If you successfully opened the project, you should see the following asset structure:

A folder structure you should see when starting the project.

Task 0.5: Understand the Changes to the Game

Because we made some changes between milestones, there will be some changes that you should be comfortable with. In fact, if you check the scripts folder, you’ll see a large number of new items. Let’s talk through the changes we are going to make:

  • The game has a new objective. In Caterpillar’s old version, there wasn’t a strong end goal. In this game version, the caterpillar will need to traverse multiple levels. Each level will now have an exit. The objective is to maximize the length of the caterpillar (eat as much food as possible) while also completing the game (making it through each level) in the shortest amount of time.
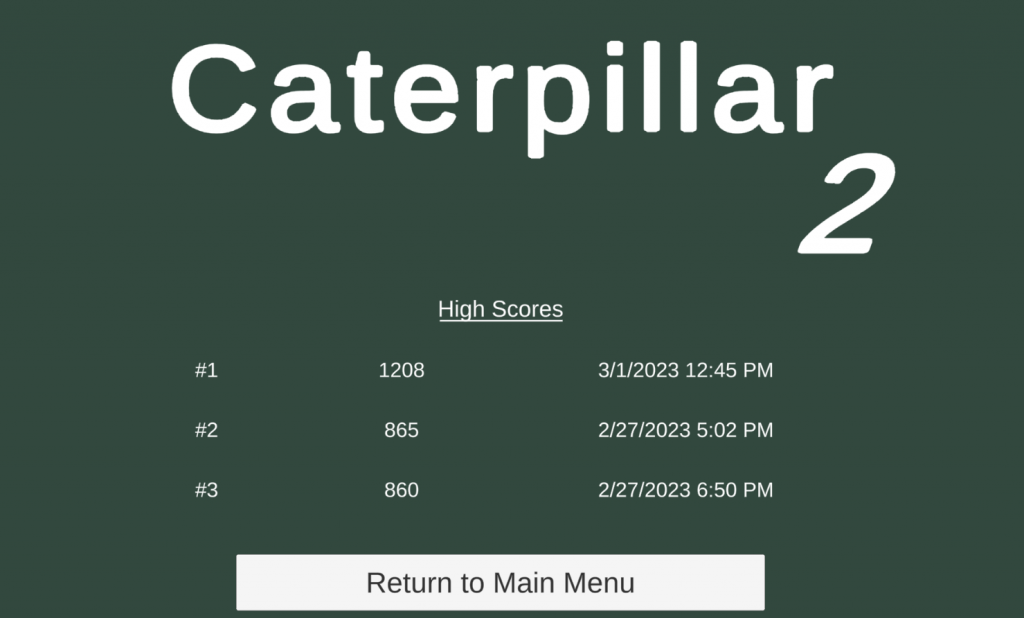
  • There are some new menu scenes! There is now a main menu, settings for the player to change, and a working high scores screen to display achievements.
  • A whole slew of new scripts is used to control these new items.
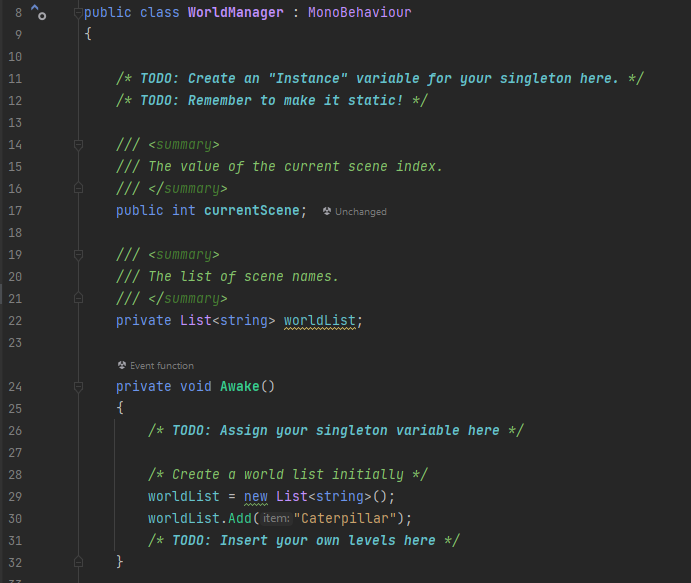
    • GameManager makes a return, but as a “singleton” class which makes accessing it easier, as discussed in the Unity learning materials.
    • There is now a WorldManager (to control scene changes and levels) and a MenuManager (to control interaction with menu objects)
    • Game settings are stored in the “Settings” game object.

Task 1: Make Some Levels

Before we start implementing the code, we need some example levels to play the game on. The updated version of the game will utilize multiple scenes to make the game more varied. Your first task is to make 3 to 5 new levels for your game. Each level should have some obstacles and is required to have an “exit” object (any game object you’d like as long as it has an “exit” script and collider on it (the collider should be set to “trigger” mode instead of collision mode). Make sure you name the levels in a reasonable way so you can load the scenes later!

A sample level is provided for you to use for your first level (containing all required objects). Feel free to edit this scene to change the level’s layout, but do not delete any managers in the level. You can (and should) also copy/paste the base of the level (floor, walls, exit) to your secondary levels to make your life easier.

Level Requirements

  • Good Names (so you can keep track of them later)
  • A level (floor, four walls, with a “Map” object)
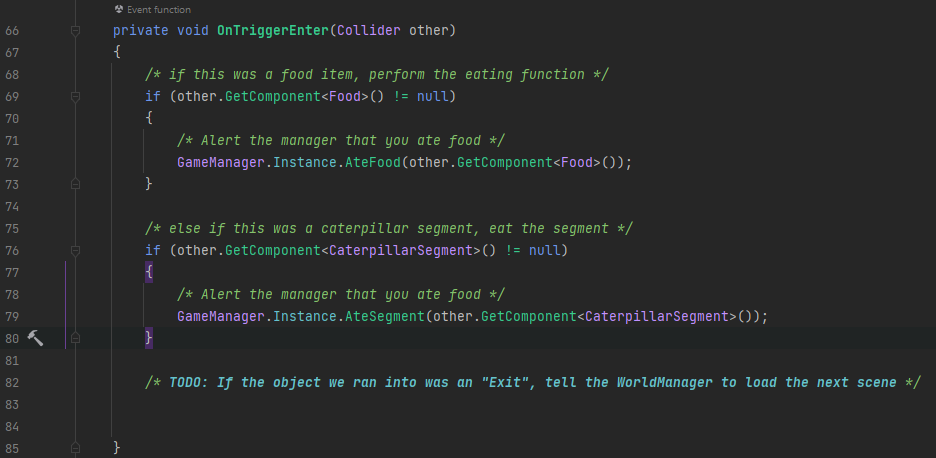
  • An exit (any trigger collider with an “Exit” component)
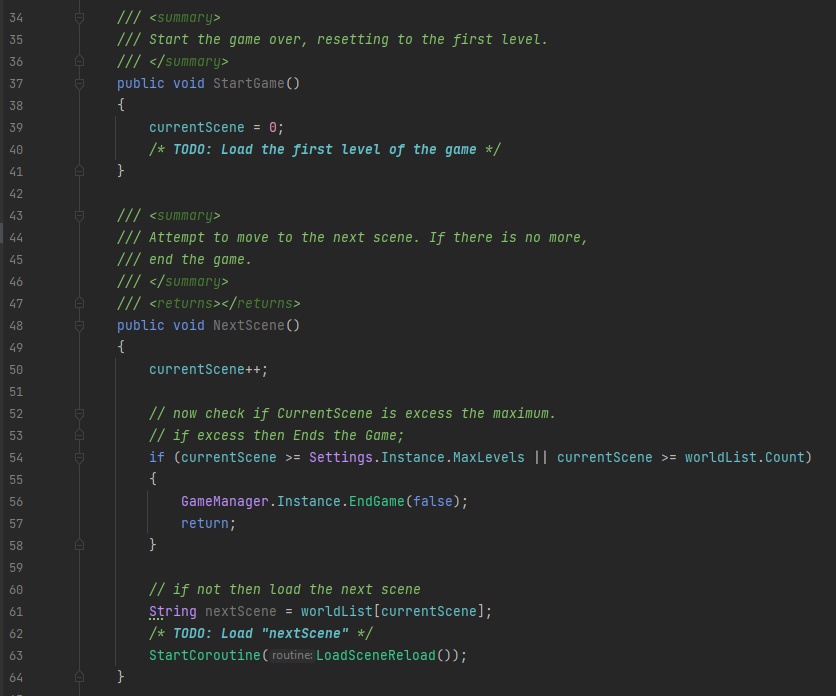
Once you’ve created all of the scenes, you should make sure you add them to the “build settings” (File > Build Settings). Drag each of your new scenes into the “Scenes In Build” window. Ordering does not matter.

The build settings window. Each of your levels should appear in the “Scenes in Build” window.

Task 2: World Manager Singleton

The first major change you must make is turning the WorldManager class into a singleton class. As covered in the learning materials, we can use static variables to make code and data persistent (or accessible) between scenes and between objects. A singleton is a special subset of the static variable, where, as the name suggests, only one instance is allowed to exist at a time. If multiple versions exist, the copies are destroyed.

For correctness, the WorldManager must become a singleton class. Using the patterns discussed in the learning materials, you should first create a static “Instance” variable for the WorldManager. You should then turn this instance into a “singleton” by checking to see if it is already assigned before assigning the instance value. If you need a hint on how to accomplish this, the “GameManager” script (Instance variable and awake function) is a good guide on how to accomplish this.

Once you have created the singleton, you should also make it persistent. To do this, use Unity’s “DontDestroyOnLoad” function to ensure any data stored in the class is not destroyed when changing between scenes.

WorldManager.cs with the additions required for Task 2 and Task 3 shown.

Task 3: World Manager World List

The world manager also needs to be able to load the levels you created; to do so, it needs the names of the scenes the levels are contained within. The supplied initial level must be used for the first level, but feel free to order your own custom levels however you’d like. Simply add your level names into the worldList variable to allow them to be loaded later.

Task 4: World Manager Functionality

Now that the world manager is set up, you must finish implementing the actual functionality for two functions.

  • StartGame()
    • StartGame is called when the game is started from the main menu, so it needs to “start the game over.”
    • You must add a code line to load in the game’s first level.
      • What function is used to load scenes?
      • How do you get the name of the first scene?
  • NextScene()
    • NextScene is called when the caterpillar reaches the exit of a level.
    • You need to add a line of code to load the next scene in the list; the level’s name can be found in the nextScene variable.
WorldManager.cs and the two additions required for task 4.

Task 5: Using the World Manager

The biggest part of this project, the world manager, is fully implemented! Now it’s time to actually call the two functions you implemented to make the game’s scene flow work.

The first function is “OnTriggerEnter” in CaterpillarHead.cs. As you implemented before, the function currently detects when the caterpillar runs into something, be it food or its own body. We now also need to trigger an event when we run into an “Exit” gameobject. When an exit is collided with, the WorldManager needs to be told to load the next scene. A few key points to remember:

  • How do we reference or call functions on the WorldManager when it has a static “Instance” variable?
  • How do we use a conditional to tell what type of object we ran into?

The second function is the “StartGame” function in the MenuManager. The StartGame function is called when the user exits the main menu and needs to start the game. You need to link this “StartGame” function in the MenuManager to the “StartGame” function in the WorldManager by calling it. Similar to the first half of this task, it’s important to reason about how you reference the WorldManager and call functions on it.

CaterpillarHead.cs – the first instance where code needs to use the WorldManager.

Task 6: Saving High Scores

Up to this point, we’ve looked at inter-scene persistence, singletons, and scene loading. The last important part of this milestone is using inter-game persistence. Sometimes it is important to keep data accessible after a game has been exited completely (high scores, save files, etc.). In our case, we need to save the game’s high scores to the computer to be potentially loaded after the game is closed. In this way, we can keep “real” high scores that actually have meaning. We can save persistent files (files that can be accessed after the game is closed) on the disk at a specific location (Unity docs). We will use JSON files to save our data to the disk, as that is what the learning materials used.

The data flow used to save scores to the computer and to read them back.

In “HighScores.cs”, you will complete the “WriteScores” function. The “WriteScores” function is responsible for writing a new file to disk containing scoreList (an array of scores). You need to convert the scoreList object into a JSON string (using the JSON Utility from the learning materials). This JSON string can then be written to a file on the computer using a C# function (C# docs). Once you’ve completed both of these things, you will have half of the high-score system working!

Task 7: Loading High Scores

Now that you’ve written the high score file to the disk, you need to also be able to read it back into the game when needed. For this, you should finish implementing the “LoadScores” function. For this function, you essentially need to do the opposite of what you did when saving the scores. First, you need to read the JSON file back into the game (as a string). Once you’ve loaded the file contents, you need to convert them back into a “ScoreList” object so you can actually read the high scores.

For this function, you’ll need to use a C# function to read the contents of the file (C# docs). From there, you need to use the same JSON utility you used in task 6, but use it in “reverse” (make an object from JSON, not turn it into JSON).

The High Score system (HighScore.cs) that you need to implement.

Once you’ve finished that, your game is done! You have experimented with three extremely important concepts in this milestone:

  • Data structures (singletons, instance variables, static variables).
  • Scene loading and scene flow.
  • Data persistence (keeping data around after a scene is unloaded or when the game is closed).

Keep these concepts in the back of your mind when programming games in the future. They are really helpful when coding if you want to keep things clean and organized. In the next milestone (the last one!) you’ll learn another important concept in coding Unity games – object-oriented programming. You’re almost done. Keep up the hard work, and finish strong!