Junior Programmer: Create with Code 2

Introduction

Moving forward from milestone 3’s foundational programming work, it’s time to delve into more advanced programming concepts. This upcoming milestone will equip you with a set of tools that extend beyond game design and can be applied to future programming projects. You will gain valuable skills in debugging, optimization, and version control, which are relevant not only to programming but also to associated non-programming tasks. Upon completion of this milestone, you will be ready to explore Unity-specific concepts such as scenes, game mechanics, effects, and data flow, as well as advanced programming topics like object-oriented programming.

Goals

To complete this milestone, you should be able to demonstrate the following skills:

  • Prototyping and fast iteration of a Unity game
  • Selecting appropriate data types for required functionality
  • Utilize the Unity API in order to use Unity’s advanced features
  • Write code in a readable, efficient style
  • Debug code at a basic level
    • Compile Errors
    • Runtime Errors (exceptions)
    • Logic Errors
  • Logic Structures
    • Lists
    • “for” loops
    • Control flow
  • Effects
    • Sounds
    • Particle Effects

Learning Objectives

StandardDescription
3A-AP-15Justify the selection of specific control structures when tradeoffs involve implementation, readability, and program performance, and explain the benefits and drawbacks of choices made.
3A-AP-13Create prototypes that use algorithms to solve computational problems by leveraging prior student knowledge and personal interests.
3A-AP-14Use lists to simplify solutions, generalizing computational problems instead of repeatedly using simple variables.
3A-IC-27Use tools and methods for collaboration on a project to increase connectivity of people in different cultures and career fields.
3A-CS-03Develop guidelines that convey systematic troubleshooting strategies that others can use to identify and fix errors.

Content

Once again, you will be using Unity learn for your learning materials. Specifically, you should work through the “Create with Code 2” mission (part of the Junior Programmer pathway). This is a continuation of the “Create with Code 1” mission and has multiple projects which give you experience with multiple different Unity concepts. You’ll start with effects and sounds, and you’ll finish with testing and feedback.Along the way, you’ll gain skills in UI development, mechanical development, and several advanced programming skills.

Recommended

  • Unit 3 – Sound and Effects
  • Unit 4 – Gameplay Mechanics
  • Unit 5 – User Interface

Optional

  • Introduction to user feedback and testing

Milestone Project – Caterpillar

A gif recording of the completed game.

For your milestone project, you will be completing a game called “Caterpillar”. Caterpillar is a similar game to the old arcade game “Snake” (example of the original linked here). Instead of a snake, you’ll play as a hungry caterpillar who just wants to walk around and eat cheese and cake – yum! The caterpillar grows as it eats food, but beware. The caterpillar can run into itself and eat one of its segments, making it smaller. The caterpillar has to keep moving (the game will end if it sits still for too long) and avoid running into itself while also continuing to eat and grow larger. The game ends when the caterpillar stops moving for too long, or when the overall time runs out.

Task 0: Download the Project Template

NOTE: There could potentially be a version mismatch when you download this Unity project to work on it. If Unity gives you a warning about a version mismatch, just open the project anyways with whatever version you have installed. For these projects, we aren’t doing anything which would break if you use a different version of Unity.

To complete this milestone project, you will need to download some starter assets we created to guide you. They are located on our resources page, under the milestone 4 heading. Assets are provided as a zip file, containing an entire project inside. Extract the project from the file, and save it in a location which is convenient to you. Once extracted, you should be able to open the root folder project with Unity Hub (Hub > Open > Folder), and open the project in the Unity editor.

If you successfully opened the project, you should have the following asset structure:

The asset structure of the opened project.

Task 1: Create a Map

First, open the scene used for the game (Assets > Scenes > MainGame). It should just contain a camera, game manager, light, empty map container, a UI/event system, and a caterpillar. Notice that the poor caterpillar has no world to walk around on. Your first task is to fix that.

Using a plane for the floor and cubes for the walls, design a map with the following requirements:

  • The floor (a plane) should be of scale (10,10,10) and positioned at (0,0,0).
  • Each side of the plane (+x,-x,+z,-z) should have a wall (made from a stretched cube).
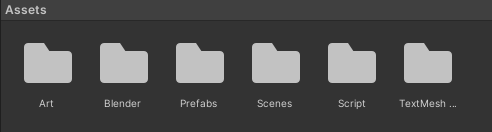
  • You should place a few obstacles (rocks are located in Assets > Art > Models) around the map to add difficulty to your game.
  • All map components (floor, walls, obstacles) should be children of the “Map” game object.

To create the floors and walls in your project, you can utilize Unity primitives by right-clicking on the hierarchy and selecting “3D object”. If you prefer, you may also use these primitives to create objects, but you also have the option of using the supplied rock models, or providing your own models for obstacles.

Task 2: Texture the Map

Now that you have a basic structure for the map, it’s time to make the map look more thematic. Because the game’s main character is a caterpillar, a good world theme might be a grassy, outdoorsy theme. For your next task, you will be adding an art style to your game. You should do the following:

  • Create a new material for the floor, the walls, and the obstacles.
  • Apply the materials to the floor, walls, and obstacles.
  • Add an image texture to at least one of the materials.
  • Alter the “tiling” on the image texture’s material to change the look of the texture.

Some potential grass textures are provided for you in the textures directory (Assets > Art > Textures), however you are welcome to use your own textures. You can either make your own images, or download them from a website (like OpenGameArt). You are welcome to style your game however you choose!

If you get stuck on either Task 1 or Task 2, you can pull a sample, completed scene from the “Extras” directory (Assets > Scenes > Extras).

Task 3: Place Food Prefabs

Now that a solid world is in place for our game, we should make some food for our hungry caterpillar. The caterpillar will have a choice of two items to start with – some cheese, and some cake. There are two “food” prefabs located in the prefabs folder (Assets > Prefabs).

The GameManager object in the hierarchy has a field called “Food Prefabs”. Drag both the cheese and cake models into the field to allow them to be spawned as food objects.

Task 4: Implement Caterpillar Movement

Finally, it’s time to start coding. The first major feature of our game is getting the caterpillar to move. The caterpillar is made up of two different objects: the head (the front with eyes and antennae) and the segments (spheres with legs). The head will be the primary way to interact with the game. Specifically, the head needs to continually move forwards and the user is given the ability to rotate it.

Start by opening the “CaterpillarHead.cs” class in the scripts (Assets > Script) directory. You will be completing two lines in the “Update” function.

The update function with missing lines

You will be implementing the rotation of the caterpillar head. First, you need to read (and store) the “rotation” input from your user. Then, you should use that “rotation” input, along with the “RotationSpeed” variable (located at the top of the file), to rotate the caterpillar head accordingly.

Task 5: Make the Segments Follow

Now that the head can move freely around the scene, the individual segments need to follow too. To implement this, you’re going to need to open the “GameManager” script (Assets > Script) and navigate to the “UpdateSegments” method (line 89 originally).

Overall, the algorithm looks like this:

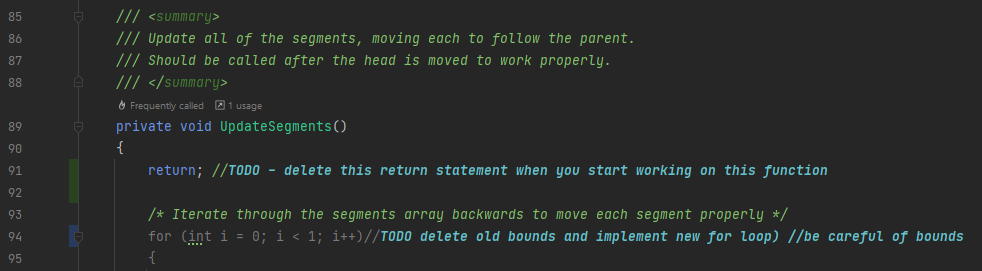
  • For each segment in the segments list (excluding the first)
    • Save the “direction” from each segment to the segment before it in the array
    • Move the segment slightly in the saved direction
    • Rotate the segment to more closely match the direction it moved
  • Move the first segment towards the head of the caterpillar

Your role is to finish implementing the algorithm by creating the actual iteration arguments in the for loop. The rest of the algorithm has been implemented for you (but it is recommended to read it to get a bit of an idea how vectors work!).

You should delete the “return;” line at the beginning which was added so the code doesn’t constantly error out when running. Then, delete the old bounds in the for loop (int i = 0; i < 1; i++) and replace them with the correct bounds based on the description of the algorithm above. Remember to pay special attention to the “bounds” on your loop!

The “UpdateSegments” function along with missing for-loop bounds.

Task 6: Implement Collision Detection

Now that movement is completely implemented, it’s time to think about the actual core gameplay mechanic – eating! The caterpillar needs to be able to detect when it runs into a food object (or into its own segments) and handle the event accordingly.

For our game, we want to use collisions, but not have the colliders interact with the world at all. Because of this, we will use a “trigger” instead of a “collider”. Triggers can be detected using the “OnTriggerEnter” function. Your job will be to implement this function in the “CaterpillarHead” script (Assets > Script). The empty function is already provided for you; you are required to implement the logic outlined in the code.

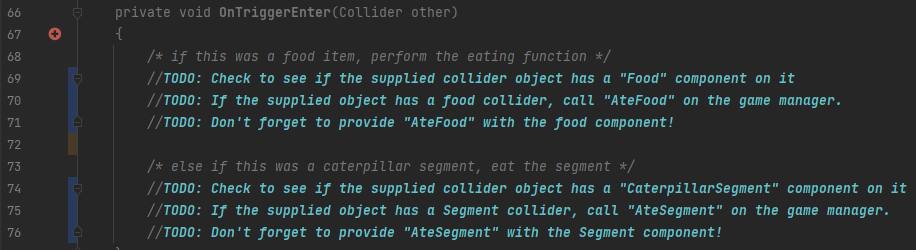
  • If the item collided with has a “Food” component, call the “AteFood” function on the game manager component (you’ll have to “locate” the game manager somehow)
  • If the item collided with has a “CaterpillarSegment” component, call the “AteSegment” function on the game manager component.

This is going to take several steps to accomplish – break your work into several pieces:

  • How can you see if a component is present on a supplied object?
  • How can you get a reference to a type of game object in the scene (hint: look up “Find” functions).
The functions which need to be completed.

Task 7: Implement Eating Segments

Now that the actual eating “events” are taken care of, it’s time to implement the eating itself, starting with eating a segment from the caterpillar. In the “GameManager” script (Assets > Script) navigate to the “AteSegment” function.

You will have three major responsibilities for this task:

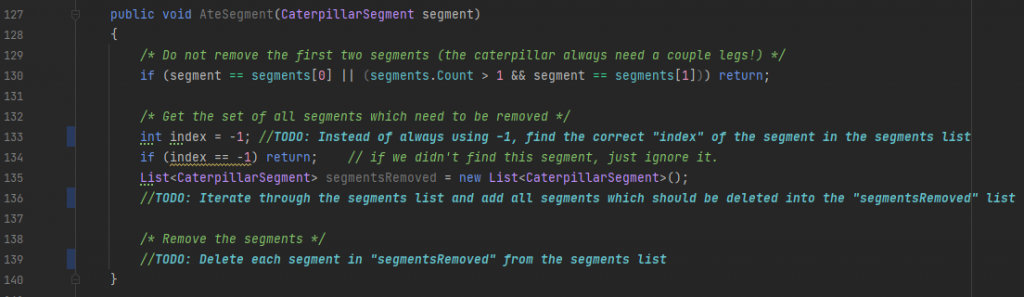
  • Find the index of the segment which got eaten.
  • Compute (and store) the segments which need to be removed.
    • How do we know which segments need to be removed? If the caterpillar has 10 segments and the 5th is eaten, all segments between the 5th and the 10th (inclusive) should be removed (they “fall off”).
  • Remove the segments which need to be removed.
    • Remove the segments from the segments list, not the “segmentsRemoved” list
Required implementations for the “AteSegment” function in the game manager.

Task 8: Implement Caterpillar Growth

Similarly to the previous task, we need to implement eating food. The actual function is implemented for you, but an important part, growing the caterpillar, is not. Navigate to the “AteFood” function in the game manager.

Notice how, when food is eaten, it is deleted, a new piece of food is spawned, and “AddSegment()” is called. “AddSegment” will be your responsibility. Navigate to that function, also located in the game manager.

For this function, you need to take the newly created “segment” object and actually incorporate it into the caterpillar.

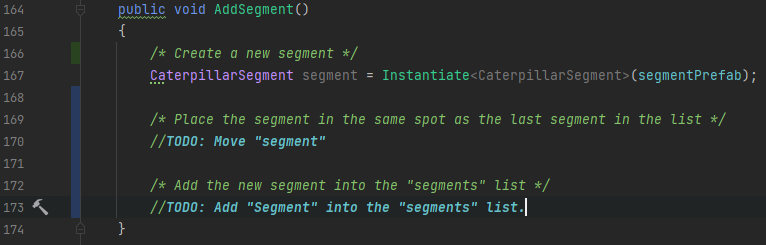
  • Move the segment into the correct position (it should match the position of the last segment on the caterpillar).
  • Add the new segment into the segments list.
The unimplemented AddSegment function.

Task 9: Customize!

You did it – the game is completely implemented, or at least the prototype. Now it is up to you to finish the game however you please. The game might need balancing, art changes, or anything else you notice and want to change.

  • Are you happy with the forward speed of the caterpillar? What about the turning speed?
  • Do you like how score is calculated? How might you want to change it?
  • Is there too much time in the level? Too little time?
  • What graphics look bad to you? Can you replace them? What about color scheme?
  • There’s no sound currently. How might you implement sound?

Don’t forget to share your progress. Other people who play your game (often called play testers at this stage) might have valuable feedback about your game.

Your next milestone will focus in on scenes, data, and level management. Best of luck!